When I started working on this project, I wander around to see different possibilities to build a free bios. The first question was thus indeed : what type of free bios GPL'ed source codes are available ? But second vital one was : which one would enable me to carry out rapidly a prototype ? The stakes were simple, answer theses question, realize this answer concretely, and compile all of my remarks and notices in a reference documentation.
Early in this process Linuxbios set itself as the uniq base solution, and I can say now obvious. Itself falls into many aggregated solutions, Freebios project, Openbios project and Linuxbios have united forces. Indeed, other smaller projects primarily external then became "internalized" solutions as more and more people came by and wanted to use it.
To build a Linuxbios BIOS you basically need to know more about Linuxbios base solution but you need also a flashing solution to burn your Linuxbios into a BIOS chip. Of course, flashing solution study will explain what to use from flash utility to BIOS chip. Moreover, you'll need a logging solution to "see" and record your Linuxbios first run activity. Next is for you to consider what booting solution and what payload i.g Os to boot you will need. At last, you will see that the display solution is still quite a piece of problem, whatever not fully implemented on EPIA motherboard.
Well here we are. If you read "why Linuxbios" and "played with kernel building", still you need to know what tools it offers to configure your free and open specifications bios. It's not as complex as you think... except if you are looking to master the subject and/or to develop upon Linuxbios. All the same, you have to go through some short generalities before configuring properly Linuxbios. If you intent to master, you could then dive in Linuxbios advanced features.
When it has begun at LANL, Linuxbios was meant to boot kernel in a clustering environnement (cf. glossary cluster) it was fetching on a server kernels. Application has now extended. Linuxbios fills the gap left by actual proprietary BIOS and corrects their errors which make unrealizable, unsupportable maintenances on machines and which harden human-machine interactions. For instance,"F1 press" after every BIOS update is a dull, repeatitive task when you have hundreds of computer in a grape. Also who would wait memory test to pass at every turn on of a MP3 pocket reader ? And how to "Press F1" without any keyboard if a BIOS update could be made possible ?
In all seriousness, beyond it is obviously unconfortable, beyond it is utterly closed source, it's a matter of fact theses proprietary bioses still maintain alife old fashioned functions. Theses are not used anymore such as DOS support whilst newly requiered functions are not developped such as large ROM storage support, as large RAM storage support, etc..
Linuxbios thanked to full configuration "compilation" mechanism satisfy to this. Since primarily Linuxbios is a divertment, its design and developement is inspired by the wish to write as minimal code as possible in order to let Linux kernel do the rest, what it does from the start. Indeed, as evocated before Linuxbios falls into two major parts : a bootstrap and a Linuxbios Linux Kernel prepared in the howto part of the linux kernel study.
In order not to have any troubles compiling Linuxbios itself, refer to Linuxbios software toolchain
All right, let's come to Linuxbios working. To build up Linuxbios from its source, three elements are involved :
Crt0.S sets enough code to start up binary Linuxbios bootstrap (although written in C). Ldscript.ld defines this bootstrap's reallocation adresses in order it could be found equally into a 256KB BIOS ROM or into a DOC 2000 8MB.
Another Linuxbios fundamental feature is that, all of the info on your build machine hardware is dispatched in all source tree directories involved in your BIOS building. It's you, when tweaking highest level configuration script, whom indicate for what motherboard, extensions and hardwares you wish your BIOS to be built. Below is clarified what you can find in Linuxbios source tree from src/ directory :
arch/        Crt0.S, ldscript.ld as well as Linuxbios Descriptor tables and other pirqs tables for i386.
boot/        bootloaders code : elfboot and filo.
config/      High level Configuration file architecture independant. Options file
console/     Code installing base console (text or vga) as well as UART825038 file
cpu/         Init. and reinit. codes  CPU, MTRR, cpuid.
devices/     For PCI resources assignment and PnP handling.
include/     Same nested tree for headers and definition files.
lib/         Redefined memory allocation code file.
mainboard/   Supported mainboards initialization code. (if it's not in, you're not)
northbridge/ Northbridge chipset init.
southbridge/ Guess what ...
pc80/        8086 arch. common compound init. such as keyboard, etc..
sdram/       Code to probe SDRAM
stream/      Bootload stream check code.
Config. files stands out as landmarks all along the source tree. Either they look like a mini-makefile, either they look rather like dialect codes. For instance, have a look to this one, boot/config.lb, which configure boot behavior :
object elfboot.o
object hardwaremain.o
if CONFIG_FS_STREAM
        object filo.o
end
Theses beneath instructions are indeed compilation directives, they aren't directly understood by Make but they are by Buildtarget.
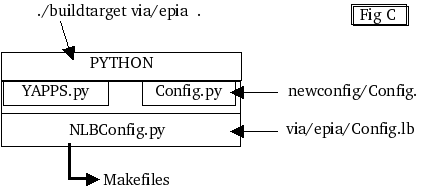
Buildtarget is a shell script located in target/. When executed it parameters and generates Make file as well as crt0.S and ldscript.ld files in order everything is right to compile.
[root@ge targets]# ./buildtarget
usage: buildtarget target [path-to-Linuxbios]
For instance, target for VIA EPIA is via/epia (base directory is mainboard/). Although second parameter is facultative it is strongly recommended for you shoudn't build targets in sources to prevent corrumption. Buildtarget call Python interpreter with NLBConfig.py, both of them understand configuration dialect code.
NLBConfig.py scours config.lb file, analyzes syntax, and check used keywords in comparison with Options.lb dictionnary file located in src/config. This file assigns default values to each keyword. It look like this (truncatured) :
         define LINUXBIOS_COMPILER
                        default "$(shell $(CC) $(CFLAGS) v 2>&1 | tail n 1)"
                        export always
                        comment "Build compiler"
         end
[...]
         define ROM_IMAGE_SIZE
                 default 65535
                 format "0x%x"
                 export always
                 comment "Default image size"
         end
"Father" Config.lb file calls reccursively every "son" Config.lbs which self instructs unit C file compiling by the 'object' keyword (as "son" file boot/config.lb shown it previously). You can retrieve exhaustive instruction list from Stefan Reinauer's AMD64 Port Guide available at openbios.org or at Linuxbios.org.
I have spotted in my Config.lb some landmarks for you to compass :
# Sample config file for EPIA
# This will make a target directory of ./epia
#
# Change for experiments MD
# ven avr 16 16:50:07 CEST 2004
#
loadoptions
target epia                             -- Target directory specifing

uses ARCH                               |
uses CONFIG_COMPRESS                    |  Each Variable declaration *compulsory*
uses CONFIG_IOAPIC                      |   before before use
uses CONFIG_ROM_STREAM                  |

[...]

# Comm settings
option DEBUG=1                          |  Debugging mode activation &
option TTYS0_BAUD=115200                |  serial port speed config.
option CONFIG_CHIP_CONFIGURE=1
option MAXIMUM_CONSOLE_LOGLEVEL=8       |  Verbosity level for debug
option DEFAULT_CONSOLE_LOGLEVEL=8       |  string displaying to console

# Graphics settings
option CONFIG_CONSOLE_SERIAL8250=1      -- Activation of UART8250 dialog protocol for serial port
option CONFIG_CONSOLE_VGA=0             -- Ggraphic mode  VGA deactivated (if activated serial port redirecting become useless)
option CONFIG_CONSOLE_BTEXT=1           -- Btext mode activated

# Misc options
option CONFIG_COMPRESS=1                -- Enables gz'compressed kernel handling
option MAX_REBOOT_CNT=2                 -- Max reboot count in case of error before bailing out
option CONFIG_SERIAL_POST=1             -- Display POST phases debug
option HAVE_HARD_RESET=1                -- System hardware reset native handler
option AUTOBOOT_CMDLINE="hda1:/vmlinuz root=/dev/hda3 console=ttyS0 "
                                        -- Boot command line and Kernel passed parameters :
                                        -- kernel is called vmlinuz and is located on hda1
                                        -- Root partition is hda3, main console is redirected to serial port
[...]
Difference between every "son" config.lb and "father" config.lb will become more evident to you after editing many time various one. Primarily, Config.lb are names after that sense guiding you to edit and modify their content in order to make things working properly. But be careful because in a unclever, confusing manner they also named another file Config.lb, located in sources (!) src/mainboard, which you don't (normally!) have to modify at all. If it's true it "configures" mainboard like their false friend located in src/target and it used the same dialect code, that is over for the rest. Indeed, it is a default base file stuffed with critical values for your mainboard, thus if it is supported, it got to be all right here without your tweakings. I insist heavily, wrong statements in there will immediatly be paid back at "buildtarget stage" !
Equally, be careful with options you use, some of them just exclude each others. In some cases buildtarget script will stop in error while in some other buildtarget won't shout but results are undefined. Every solution that is chosen thus must be activated in father Config.lb as well as in its various, dedicated or not, son Config.lbs in order to be effectively build.
When buildtarget works correctly you should have something like this below.
                Build ROM size 262144
                Verifying ROMIMAGE fallback
                Verifying ROMIMAGE normal
                Verifing global options
                Creating via/epia/epia/fallback/static.c
                Creating via/epia/epia/fallback/Makefile.settings
                Creating via/epia/epia/fallback/crt0_includes.h
                Creating via/epia/epia/fallback/Makefile
                Creating via/epia/epia/fallback/ldoptions
                Creating via/epia/epia/normal/static.c
                Creating via/epia/epia/normal/Makefile.settings
                Creating via/epia/epia/normal/crt0_includes.h
                Creating via/epia/epia/normal/Makefile
                Creating via/epia/epia/normal/ldoptions
                Creating via/epia/epia/Makefile.settings
                Creating via/epia/epia/Makefile
That is clear enough, this has created standard make files, fallback and normal ROM make files. All's right, makefile is done but before launching a reccursive long Make, you can check out if options are finely reported in Makefile.setting file. By the way, you can notice that crt0 and ldoption are also created here. The later file presents even simplier chosen options, compiling and linking ones.
Change directory to target/_vendor_/_product_/_target_dir and launch "make". In fact, it will runs two differents makes : one for fallback mode and this other for normal mode. By the way, there is another way to get linking and compiling options displayed by typing "make echo". Here are some main make targets : Linuxbios.rom, echo, build_opt_tbl, Linuxbios, Linuxbios.strip, romcc, build rom, clean.
Remark : buildrom, romcc, build_opt_table are compiled upon compiler call represented via $HOSTCC variable. In other codes, it is represented via $CC variable. This is because Linuxbios is build not necessary on the same host/build machine. If it is (false :) then both of theses variables should have "gcc" value.
Targets references self and others in a pointer storm. Here are a overview of main dependencies :
                All
                + Linuxbios.rom
                  + Linuxbios.strip
                    + Linuxbios
                       + Crt0.o
                       + Initobjects
                       + Linuxbios_payload
                       + ldscript.ld
                    + Buildrom
Initobjects are primarily C source files, content files if I can write so. At the opposite, crt0.o and ldscript.ld are the application backbone. Initobjects are designated as such because of the "Object" dialect directive as we've seen in the end of upper part Generalites. Precompilation parameters are mostly located in theses InitObjects. Concretely, precompilation directives are present typically under a '#define' or '#ifdef' form. You can also find them back while compiling as gcc commandlines shows their '-D_XXX' strings which was listed in ldscript file. Here is an exhaustive compiling steps ordered list :
        1.  Linuxbios version file is compiled
        2.  romcc file is compiled
        3.  crt0.s file is assembled, failover.c and auto.c are compiled with romcc
        4.  initobjects objects are all compiled
        5.  initobjects references are gathered into Linuxbios.a
        6.  Linuxbios_c object is compiled with Initobject objects, Linuxbios.a and libgcc.a
        7.  Linuxbios_c exec. code file is done.
        8.  symbol map of this file is recovered into Linuxbios_c.map
        9.  linubios boot code is generated with ldscript.ld and crt0.o
        10. Linuxbios objects are copied into Linuxbios_payload
        11. rv2b upon compilation is applied to Linuxbios_payload by compression. New code name is Linuxbios.rom
        12. Linuxbios boot code is regenerated with ldscript.ld and crt0.o
        13. Linuxbios symbol list is stored Linuxbios.map
        14. Linuxbios objects are copied into Linuxbios.strip
        15. payload is compiled if exists.
        16. buildrom is compiled and called with Linuxbios.strip, Linuxbios.rom and payload.rom
Refer to target building dependencies synoptic flowchart to have a visual reference.
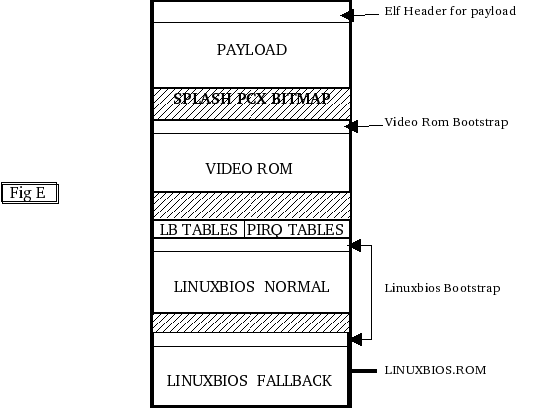
You now have a Linuxbios.rom file generated in target/_vendor_/_product_/_target_dir_ directory. This is a binary code adapted to your cpu and all your hardware specifications according to what was configured in mainboard/Config.lb. You can have a glance at ROM internal structure. Now, it can be flashed in a EEPROM using a flashing solution.
Before swiching to this stage, maybe you haven't noticed a fundamental thing about Linuxbios compile process that we have just partly discovered. Gcc has compiled a lot of C code file while other files have been processed by another special compiler Romcc. Why ? Let's penetrate Linuxbios bowels...
Another Linuxbios big feature is that it's admitted it must run as a standalone program. It mustn't have any external references except for previously considered config. files. That's why you can find a 'memset' code (memory mapping) in src/lib directory : in Linuxbios context it is impossible to use Linux kernel external memset code which supposes a BIOS service at this moment still not set up. I can't help exposing the simplicity of this code which BIOS will use several times such as in caching and shadowing itself. What else could be expected ?
void *memset (void *s, int c, size_t n) {
        int i;
        char *ss = (char*) s;
        for (i = 0; i < n; i++)
                ss[i] = c;
        return s;
}
All the same, there is no what a pity since memset needn't being called in real mode. But for instance, a cousin code such as RAM summing calculus code must be called in real mode (no heap, no stack). Indeed it must count how long RAM is to future memset mapping. Finally, Gcc shouldn't and can't compile this code, even if it's written in C.
Romcc is a compiler which generates from C, a peculiar byte code for ROM execution. This indicates no writing, no swapping in memory so no stack and heap mechanisms and endly no RAM needed to process. Romcc was bring with V2 version, before in V1 all 'real' codes was in assembly. Major advantage of C upon ASM: portability. RAM summing calculus is thus uniq for all motherboards. Romcc emulates stacks and heaps with CPU registers in processing swaps. Romcc generated code tends to be longer than if it was compiled with Gcc granted, but boot time shouldn't be that plundered.
At boot time, another advanced features is involved. Linuxbios creates tables which was (cleverly called Linuxbios tables. It resides in low memory and holds infos such as active motherboard, as BIOS shadow address field (in a RAM non volatile part) as well as other various Linuxbios parameters. Natively, Linux kernel preserve this table at OS start up and there on. In source tree maybe can you find a utility called 'lxbios' which recovers and reads theses tables in order for instance to validate under OS a checksum.
Linuxbios can thus use this non volatile memory part to store persistant data. Infos like boot time counter (CNT_BOOT) are defined in a structure called CMOS table. Still "visible" from OS, here is what it looks like.
| Startbit | Length | Config | ID | Name |
| 0 | 384 | r | 0 | reserved memory |
| 384 | 1 | e | 4 | boot option |
| 385 | 1 | e | 4 | last boot |
| 386 | 1 | e | 1 | ECC memory |
| 387 | 1 | ? | ? | ? |
| 388 | 4 | r | 0 | reboot bits |
| 392 | 3 | e | 5 | baud rate |
| ... | ... | ... | ... | ... |
| 400 | 1 | e | 1 | power on after fail |
| ... | ... | ... | ... | ... |
| 412 | 4 | e | 6 | debug level |
| 416 | 4 | e | 7 | boot first |
| 420 | 4 | e | 7 | boot second |
| 424 | 4 | e | 7 | boot third |
| 428 | 4 | h | 0 | boot index |
| 432 | 8 | h | 0 | boot countdown |
| ... | ... | ... | ... | ... |
| 1008 | 16 | h | 0 | check sum |
You can retrieve this file in sources mainboard/ directory. Cmos_xxx utilities are also available in source tree, it enables you to modify CMOS and Linuxbios options real time under OS. Useless to mention that you should know what you do in this...
Upgraded with V2, chained devices handling is another Linuxbios feature. Chips and devices are transparent while it is made lot easier than in V1 to call theses structured functions. On the same design, PCI data structures has been modified too comparing to V1 or Linux kernel ones. Take a look to what it now looks like:
Chip structure (static.c) :
    struct chip_control northbridge_via_vt8601_control = {
   .enumerate = enumerate,
   .enable    = northbridge_init,
   .name      = "VIA vt8601 Northbridge",
};
Devices strcuture and its device pointers :
struct device {
              struc_bus *                       bus;
              device_t                sibling;
              device_t                next;
              struct device_path                path;
              unsigned short          vendor;
              unsigned short          device;
              unsigned int            class;
              unsigned int            hdr_type;
              unsigned int            enable :1;
              uint8_t                 command;
              struct resource                   resources [MAX_RESSOURCES];
              unsigned int            resources;
              struct bus                        link[MAX_LINKS];
              unsigned int            links;
              unsigned long           rom_adress;
              struct device_operation           *ops;
              struct chip                       *chip;
}
Just from theses structures you can imagine the chainned organisation : it is said to be PCI centric.
At last, one of the most interesting feature is the ability to detach part of the Linuxbios payload onto a network machine. Indeed via DHCP or TFTP service you can retrieve a distant kernel. In case of clustering, this functionnaly is decisive. It is also possible to imagine a distant BIOS update procedure with no fiction at all. You will find fine details about part detaching and network booting in AMD64 Port Guide. Payload and boot principe are to come further in booting solution study.
You got a Linuxbios.rom file compiled, so what about flashing it in an EEPROM ? But if you didn't touch anything about ROM configuration you will only be able to burn in 256Kb chips (default). Maybe you already know what EEPROM and what software you are going to use. But in case you just don't, let's step forward to flash solution study.
Flash or burning process which consits basically in writing byte code from a Linuxbios.rom file into a BIOS compound such as CMOS chip is the ultimate achievement. Because flashing solutions depends on chip compound type, theses are at the beginning of this study.
There on, you will remark that there are two ways to get a BIOS burnt : "cold and hot" flashing, plugging. Also I describe a hardware cold flashing and explain why I prefered a software hot flashing. The study is conclude by a scheme which describe what is flashed in Linuxbios ROM.
Virtually you can burn and program any memory based electronical compound. But some dependencies are mostly bound to deadlock. Indeed Linuxbios base solution can concretely identify some chips and I had to find in theses a chip that would be also identified by the flashing solution.
They are plenty of EEPROMs that can host a byte code such as a BIOS. Let's consider the BIOS chip, a CMOS linked via a bus with its protocol. Grosso modo and according to previously described structures this is clearly designating a device. Well, Linuxbios is only capable to read from internal bus (CPU-RAM exchange circuit).
They are plenty of EEPROM on the market from different size, capacity, format. Everything is made clearer thanked to JEDEC standard (cf. IEEE standards site www.ieee.org) which is a regroupment of standards concerning chip casing and instruction set. Well endly, Linuxbios is JEDEC compliant.
To sum up, here is an overview available EEPROM :
For my experiments, I used SST chip such as SST39SF020A, as SST29EE20. I had also tested Winbond chip such as W49F002UP12B, as W29C020CP90B. I had tested a AMD AM29F0140B too. They had not same capacity but they were all of PLCC casing. There are many formats : PDIP or DIP chips have long rectangulars casings; PLCC chips have square casings (take a look at this scheme from SST datasheet); a TSOP chip is a mix from the two latter, it looks like a DIP rectangle chip whose pins would have been moved onto shorter edges. It is strongly recommended to refer to vendor datasheet to make sure that your chip is JEDEC compliant if you have a doubt.
These are so large storage solution that you can even regroup BIOS and OS in the same casing. I have previously described in the Linuxbios kernel short howto how to configure a DOC. I have explained the point in "abilities" part, point "reduction" of the feasability study. You should be able to find some testimonies on this in Linuxbios maillist (cf. quick landmarks in Linuxbios maillist archive).
Just like DOC or DOM it is even larger in terms of capacity. In there you can store your BIOS, your OS, but also your applications : a complete full features systems with all useful services. I have not tested anything about it but Linuxbios maillist archives surely contains valuable infos (cf. quick landmarks in Linuxbios maillist archive)
Primarily, I did try to cold flash and plug because hot flash and plug was said to be delicate to realize, even very risky to too dangereous. I say, you don't have to fear to be electrocuted, nor to loose your noze by smelting, or whatsoever. Truely this was really too exagerated... except if you are badly equipped to "operate" or still if you are utterly clumsy and you don't pay attention to what you do. But obviously you do if you read this g.
Hot way : It consists to unsolder original CMOS from the mainboard while running and to remplace it by a spacefree one. Then you burn it using a program. At last, you reboot and look at the result.
Cold way : It consists to unsolder original CMOS from the mainboard while its turn off. Generally, this requiers an external EEPROM programer card.
In order to do this carefuly and properly, be equipped with the adequate tweezers, remember chip notch location while you unsolder it, paid attention to use adapted pin converter if you may use any.At last, upon any doubts just download and read hardware specification properly. Your first burn must be CMOS save one !
At first I try to do it the cold way and I came to use a Willem EEPROM Programmer v3.1 20-03-2002. This is a "starter" tool, an external device which consits in an epoxy card with a DIP EEPROM slot to setup with jumpers and switchs. The lonely two pages available documentation, if I dare call it like that, and DIP2PLCC adapter botch-up had wasted my time as well as for win32 card device driver which forces me to install a proprietary OS just for testing purposes. It was so confuse I just couldn't write to the chip, only have I managed to read it.
Therefore, I gave up cold way. Actually, it force an external device adjunction thus adding more intermedia, and slowness. It is pityful to setup with its out-of-date jumpers programing. It was hot that summer, I bent dozing over my desk and dreamt I was punching cards at input. Seriously, if you have a relatively recent motherboard, prefer ease of the hot way.
Then I have tested Openbios project's DevBios tool (cf. Openbios site ref.) which reads and writes the hot way. In fact, it is a elegant solution which enables Linux to see CMOS as any other peripherical device such as a disk or a console. That is to say you can write your into it like that : "cat linuxbios.rom >/dev/Devbios". Or save your bios like this : "cat /dev/bios >save.rom". Symetric, simple this solution in a early release version presented nonetheless some powerful cons. First, this early version (first or second "official" release) support a little number of different chips. Second, it couln't write to CMOS because of my C3 Ezra cpu which is not supported by this Devbios version. I had to forget about Devbios too.
The most simple way was what I didn't remark in Linuxbios source tree, a chip flasher. It is a simple to use flash_rom tool as this below overview attest it and it supports most common chips.
        [root@ge utils]# ./flash_rom
        usage: ./flash_rom [-rwv] [-c chipname] [file]
        -r : reads flash and save into file
        -w : write file into flash (default when a file is specified)
        -v : verify flash according to file
        -c : probe only for specified flash chip
         If no file is specified, then all that happens
         is that flash info is dumped
Another solution is available but I had no time studing it. It is "lbflash" command (cf. cmos commands).
To conclude this study on a graphical resource, you can take a look to Linuxbios ROM memory layout. Lower addresses are at top.
You have achieved to configure, build and flash your free bios Linuxbios. Although I just don't know whether it will be working or not. What you need is a easy to setup and to use logging facility. This is exactly what it is about into next part.
A successful built and flashed bios ROM should allow you to think it will work perfectly. But while no display solution has been set up, neither VGA nor BTEXT mode, sole remaining solution is to checkout debug strings with the resources and tools part described experiment appareil. By the way, also check out your cable with cable pin description.
If DEBUG option and SERIAL_CONSOLE have properly been set in Config.lb, if cable is properly made up, if transmission protocol is correctly set up, normally debug messages must been sent to ttyS0 serial port. To fetch them back I studied "minicom" which is a program for modem to emit and receive packets on serial port. After several tries and bad protocol setting up, minicom appeared to be too much of a pain to be used for this study propose. Menu commands have to be triggered by several CTRL holding while multiple key hitting. Menu bars are badly refreshed, etc.. This is a recommanded tool but believe me, in fact, it does badly more that it is requiered.
In that case, what does it needs specificly ? Just to retrieve theses strings from ttySO and to display it to console. I've made up a command called Hear! bash script, which is simple to use and to configure. Let's have a synoptis :
[root@ge utils] # ./hear.sh
Usage ./hear.sh log_to_file
Logging Procedure : Howto to proceed with testing and debugging your Linuxbios:
First of all, set up your appareil as evocated just beneath. Linuxbios build machine is now fully qualified bacause you had inserted your Linuxbios CMOS chip into freed CMOS slot while flash procedure.
Second, on your other machine you just have to start Hear script pending.
Endly, just reboot Linuxbios build machine and gather debug strings into Hear logfile.
Here is typical Linuxbios startup truncatured logfile created with Hear!
****************************************************
Hear! Boot Log started on 14/05/04|15:48:02
tty in use : /dev/pts/3 from ttyS0
****************************************************
64      LinuxBIOS-1.1.6.0Fallback Fri May 14 15:25:51 CEST 2004 starting...$
65      87 is the comm register$
66      SMBus controller enabled$
67      vt8601 init starting$
68      00000000 is the north$
69      1106 0601$
70      0120d4 is the computed timing$
71      NOP$
72      PRECHARGE$
73      DUMMY READS$
74      CBR$
75      MRS$
76      NORMAL$
77      set ref. rate$
78      enable multi-page open$
79      Slot 00 is SDRAM 04000000 bytes $
80      0080 is the chip size$
81      0008 is the MA type$
82      Slot 01 is SDRAM 04000000 bytes $
83      0040 is the chip size$
84      0008 is the MA type$
85      Slot 02smbus_error: 04$
86      Device Error$
87       is empty$
88      Slot 03smbus_error: 04$
89      Device Error$
90       is empty$
91      vt8601 done$
92      00:06 11 01 06 46 00 90 a2 05 00 00 06 00 40 00 00 $
93      10:08 00 00 e0 00 00 00 00 00 00 00 00 00 00 00 00 $
94      20:00 00 00 00 00 00 00 00 00 00 00 00 06 11 10 60 $
95      30:00 00 00 00 a0 00 00 00 00 00 00 00 00 00 00 00 $
96      40:00 00 00 00 00 00 00 00 00 00 00 00 00 00 00 00 $
97      50:fe df c8 98 00 00 10 10 88 00 08 08 10 10 10 10 $
98      60:3f aa 0a 30 e4 e4 e4 c4 42 ac 65 0d 08 7f 00 00 $
99      70:c0 88 6c 0c 0e 81 52 00 01 f4 01 00 00 00 00 00 $
100     80:0f 45 00 00 00 00 00 00 03 00 70 07 00 00 00 00 $
101     90:00 00 00 00 00 00 00 00 00 00 00 00 00 00 00 00 $
102     a0:02 00 20 00 07 02 00 07 00 00 00 00 6e 02 00 00 $
103     b0:00 00 00 00 00 00 00 00 00 00 00 00 00 00 00 00 $
104     c0:00 00 00 00 00 00 00 00 00 00 00 00 00 00 00 00 $
105     d0:00 00 00 00 00 00 00 00 00 00 00 00 00 00 00 00 $
106     e0:00 00 00 00 00 00 00 00 00 00 00 00 00 00 00 00 $
107     f0:00 00 00 00 00 00 01 01 22 42 00 b0 00 10 00 00 $
108     Disabling cache$
109     Clearing mtrr$
110     Setting XIP$
111     Enabled the cache$
112     Copying Linuxbios to ram.$
113     Jumping to Linuxbios.$
Still pending there is two ways of closing script : classical by sending a end-of-file (for instance send /dev/null) or interactivly by pressing CTRL+C. At the end, Hear.sh propose to record your commentars, best is to add there experiments conditions, specific tested configuration options, some remarks/feelings. It will be placed at end of logfile as well as boot time measure.
Here is the end of this same logfile
114      found PCI IDE controller 1106:0571 prog_if=0x8f$
115      primary channel: native PCI mode$
116      Waiting for ide0 to become ready for reset... ok$
117      Testing for hda$
118      Probing for hda$
119      LBA mode, sectors=40021632$
120      Init device params... ok$
121      hda: LBA 20GB: Maxtor 32049U3                        $
122      Partition 1 start 63 length 2040192$
123      Unknown filesystem type$
124      Command terminated by signal 2
real 13.67
user 0.01
sys 0.01
----------------------------------------------
Comments :
This is a BTEXT_CONFIG test
 no payload, no videoROM, no VGABIOS
from a cold boot : no screen "video mode on" (led goes green)
from a warm boot : the screen flashes but nothing written
Results and Remarks :
Indicated '13.67' seconds boot time is actually a relatively long boot time. But remember that in debug mode, tests and displays are very time consuming. Plus in normal mode, you should not need any stream redirection which is also slowed by protocol's baud rate. The 'unknow filesystem' indicates that my payload (none = elfboot) don't accept hda part1 filesystem which is an ext3 partition.
You surely have to multiply tests and reconfiguration. For instance, in beneath exposed example my filesystem is not supported and I had to modify partly my payload and thus my kernel configuration (ext3 native support), to buid it again. I also did try to modify Linuxbios configuration to activated any ext3 option, but I couldn't find any. Maybe it is not just a payload matter then I had to study other boot solution.
This study will clarify a very important notion : the payload. It is the pure useful load, typically the OS. Although Linuxbios ROM layout represents it at top, payload is executed at the end of bios start up as logfile tail can attest. In previous bios boot example , nevertheless there wasn't any payload, bios was allthesame instructed to boot elf payload (default is ELFboot) on hda part. 1.
This clumsy permissiveness design forces to explain what's in a name to be more precise what is to boot ? A bootloader is a program which boot a payload that is an OS. A bootloader which boots an application program should be just called a loader.
I take a concrete case to explain further. For instance, to start with loading a simple payload, you can attach a funny program which would only display "Hello tragic world !" and stops. In this case, you will load from i.e hda1 a program whose format must be understood by the loader. Linuxbios no payload choice induce the activation of default bootloader or loader ELFboot which boots ELF format.
Now if you want to boot an entiere OS, previous loader must mutate into a bootloader such as FILO. But this complex distinction will become clearer further on. Anyway, simplest is to remember both bootloaders and loaders are boot solutions.
There are two conditions limitating payload program constitution. First, payload parts must fit in free and adjacent memory spaces. Second, of course, its bootloader or loader must be payload's format compatible and it must be link statically (no external dependancies, standalone).
Here is represented Linuxbios complete payload layout:
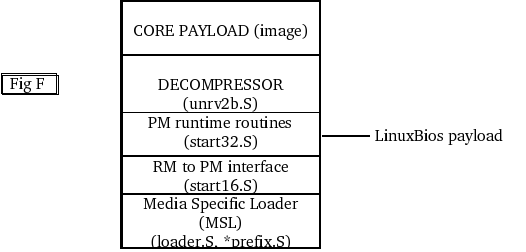
The Media Specific Layer (MSL) is core payload's decoder. Decompressor code exists if core payload is compressed (well, Linux kernel is). RM to PM interface code handles real mode to protected mode interface. For instance, if you want LILO as bootloader, payload will consist in liloprefix.S MSL (cf. ALDO source tree). Make a do-it-yourself payload takes time but Linuxbios offers supports for various ones.
There are two different boot solutions : Linuxbios native one and external ones. According to this, either a boot solution is simple and bios probes first 8KB to look for a ELF image, either it is said advanced and it could even analyse filesystem to check for specified image. Therefore, concerning simple boot solution image file must resides at ROM beginning.
Now let's list how you could design a boot architecture with theses boot solutions. Note that the two first have been internalized :
This is the default base solution activated if no other is and whether a payload is actually specified or not. It can boot from IDE devices an ELF format payload. Typically it is a Linux kernel. It can also be any other program which if needed have to be A.OUT to ELF reformatted. In order to make an ELF kernel payload from your previously prepared and compiled kernel (cf. howto part from a kernel built for Linuxbios part) you can refer to howto make a elf image appendix.
This prior external solution gained success quickly thus it has been internalized. Nonetheless infos I had gathered was rather related to external FILO version. Therefore below featuring functions can belong either to one, to the other or even both of them. It can :
This solution has extendly been tested. Written in C code it is of course completely standalone. I had chosen this solution from my Linuxbios, it seems that it has to remplace ELFboot. I had chosen this solution from my Linuxbios it seems that it has to remplace ELFboot.
It is a recent solution. It would add a USB support for Linuxbios bios. It would be a ELFboot based code solution. More infos are to be retrieved in Linuxbios maillist and archives.
Etherboot is a stable and famous project (cf. ref on Etherboot project site). It enables to boot a payload from a network machine. On one hand, it builds a small network bootstrap according to network controler chip. Actually, Linuxbios needs to be told to integrate/load it. On the other hand, a TFTP server have to be ready to respond and deliver the kernel upon client request.
It is also possible to Ether-boot with an IDE patch. Indeed, with the same solution, gain resides in enabling IDE boot while keeping the ability to network boot.
This solution used to be very implemented more than it is now. ADLO is based upon BOCHS, a kind of emulator with abstracts motherboard hardware. It offers you to build entierely your own payload. It also provides a VGA BIOS implementation which I used to test a Linuxbios display prototype. It seems that this solution is left abandoned. To my mind, it is worthy and you should check out V1 sourcetree.
When you finish testing bootloading mechanisms with ELFboot or FILO, it might not be enough if you want to sketch an advanced boot architecture. Linuxbios ables you to "mount" a complex one provided you do some more coding or some enhancements. I didn't gone that far in, theses are proposals or examples considering some Linuxbios forum posts about boot architecture successfull tests. Theses are called bootchains.
Here are some differents bootchains, from simplest to more complex ones.

Remark : It is obvious ROM/flash memory isn't at will expendable. Therefore in theses boot chains, could space may become a problem notably for longest ones ? Not at all because never a currently running payload ever gives hand back to previous one (which has launched it). In other words, a payload has no execution return, it is useless, isn't it ? Therefore theorically, current running payload can occupy its previous launcher memory, that is to say that theses multibooters/bootloader architectures are not memory spendthrift. If practically feasable, this capacity would although need a strong code enhancement to enable this.
Boot solutions are one of the most active effort in Linuxbios project. But user's boot need are versatile, so remind to keep it as flexible as possible. Keep as simple as possible while not killing Linuxbios fallback mechanism. To start with, best is to try simplest chains. If you make your boot solution to work with enough resilience (flexible and safe mostly) you can consider your free, open, Linuxbios functionnal. Indeed when Linux kernel will take hand over it should (re)initialize and in fact set your display. But you have to admit that before this stage, this wouldn't be considered that resilient without any display configured. Yes I guess what you could be thinking "if all is fine, who cares to see that bios dialog at startup and to have it displayed ?". I do, and you also when you will have some bios prompt or troubles. Anyway, do you really believe you would like to keep and load yourself down with such a strange wired appareil ? Indeed no, you don't. So let's see how to get a valid diplay solution.
Experiments don't need any graphic display to get Linuxbios working and to attest it works. But it is not possible in "an product approch", in other words, your users will want a graphic display. You know that Linux initializes a console and sets up a terminal, it also sets up the VGA driver enabling a graphic console and a graphic mode terminal.
Noticing this matter of fact, Linuxbios developpers thus implemented minimal code to initialize graphic card registers into the chipset. Roughly they send a ready-to-display byte stream to the card according to its chipset. It has been realized without a lot of code yet it isn't that simple because they had to know precisely that chipset as well as its specific initialization. Theses infos are either given by the card manufacturer either it is not. If it is then all is right.
If theses infos are declared secret, it clearly set a barrier on designing a video code. Anyway, who ever said you need to do this ? No one and there is always something that's available, the original video code stored into the graphic card ROM. It is called VGABIOS. Simply, it will be copied into Linuxbios ROM (cf. Linuxbios ROM layout).
All the same, a problem remains : theses intializations primarily lie on 16 bits mode BIOS calls whilst Linuxbios is fully 32 bits since a while up to there. To attest this is true, just consider that the first thing to be displayed when a system is turned on is the graphic card name and its manufacturer. This is made possible with 16 bits codes for at this early stage RAM has not been summed up and analysed. (cf. check out boot process to see by yourself).
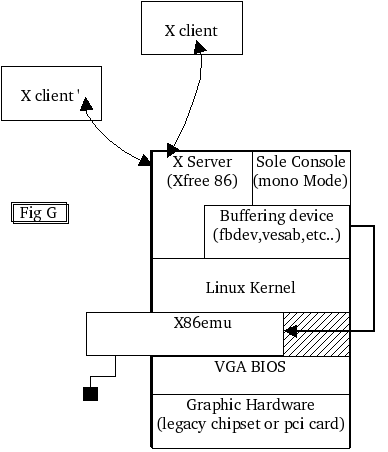
To make it through Linuxbios developpers have taken the last resort : to use an external emulator x86emu. Sure, this is not a panacea but until Linuxbios gains more support from manufacturers it is efficient. Anyway at Linux kernel graphic driver set up, it will be replaced by vesa (vesafb) or by a frame buffer device (fbdev) or even better a X server (X11). Theses drivers just need chipset to respond to managed I/O.
Stack showing different software layers to handle graphics in Linuxbios :
Of course, nothing stops you from not desactivating SERIAL_DEBUG while building your next Linuxbios. I let you know that it won't prevent this VGA solution to work anyway. Linuxbios source tree provides testbios to check and validate your video ROM. Then you can test direct writing to stress I/O frame buffers and validate your X server. Endly, you can test graphic modes. Theses two tests I've made quickly are graphic tests scripts.
To conclude this section and all the study part I would say that I've reveleaved a lot of Linuxbios globally and peculiarly. This study which is very Linux oriented and very server-client oriented still stays general. As I've stated in the disclaimer remember it is a specified Linuxbios project, an instance if you prefer.
I think you now have all the keys to even develop from Linuxbios project if you have coding knowledges. Linuxbios project like other FLOSS communities is always pleased to welcome all contributors.
Next section is a pure HOWTO configure and combine studied solutions for VIA EPIA-M motherboard.